Custom Domain using Cloudflare
You might want to route your analytics traffic through your own domain. This will lead to fewer DNS lookups as well as prevent AdBlockers from blocking it.
If you are using Next.js we recommend using the Next.js Proxy instead. We also offer an easier method for Netlify users.
Requirements
- Cloudflare Account (https://www.cloudflare.com/)
1. Create a new Cloudflare Worker
- Click on the Workers tab & Create a new worker

- Copy and replace the code from https://github.com/splitbee/proxy/blob/main/index.js into the text area from Cloudflare Workers.
Name your worker that you can recognize the worker afterwards.

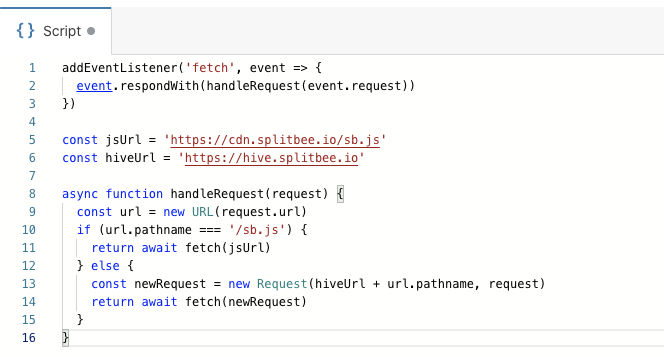
- Click on "Save and Deploy"
✅ Your worker is now available under https://something.else.workers.dev
You can already use https://something.else.workers.dev/sb.js as a custom domain in your script.
2. Link your Cloudflare managed domain to the worker
After deploying the worker, you need to navigate to one domain of your choice managed by Cloudflare.
- Choose the "Workers" tab in the menu
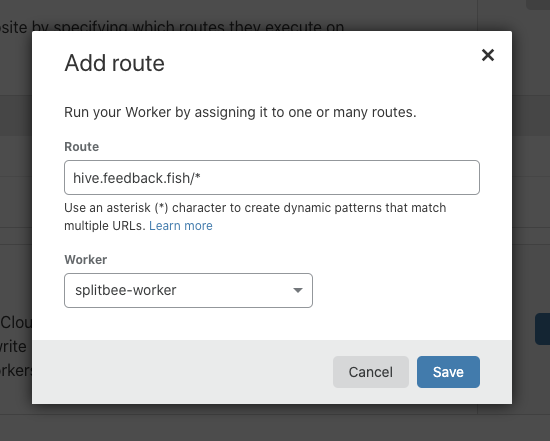
- Press Add route
- Add the domain followed by
/*you want the worker to be available at. In this example we are usingfeedback.fish. Our route would be:hive.feedback.fish/*
Just select the previously generated worker in the dropdown.

Last, we need to link the subdomain to a random IP. Navigate to DNS and create a new A record


Done! The new worker is available under hive.feedback.fish (not yours)
3a. Use the custom domain in the script tag
To use your custom domain, just replace the Splitbee script tag with:
<script async src="https://something.else.workers.dev/sb.js"></script>
In our example, feedback.fish, it would work like this:
<script async src="https://hive.feedback.fish/sb.js"></script>
3b. Using the JavaScript Library
In the init from our @splitbee/web library, you can provide the URL to the proxied script.
splitbee.init({scriptUrl: "https://something.else.workers.dev/sb.js"})
You can confirm by checking the DevTools network tab that all traffic indeed flows through your domain.